This has been greatly simplified by changes to Fldigi, at least from version 4.1.19 onward.
Fldigi
This will work with almost every DRA interface. Disable the built in VOX for this to work on units with VOX (DRA 30-36 do not have VOX). I’m assuming you already have attached your DRA device to your computer and radio.
- Open Fldig software, then click from the drop down menu on the main display:
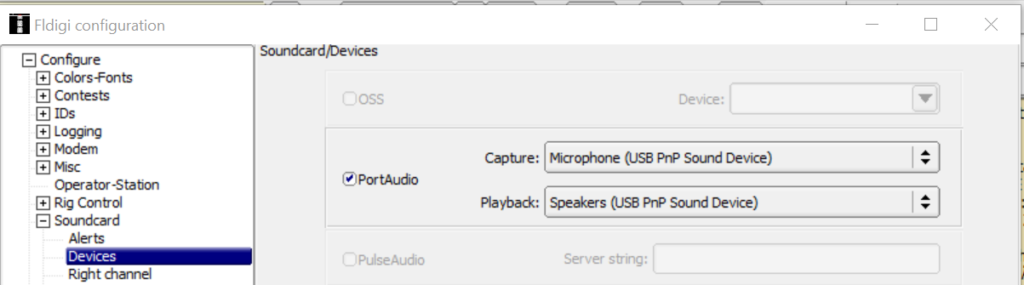
- Configure / Config Dialog / Soundcard / Devices
- Set the Capture and Playback to the appropriate USB PnP Sound Devices
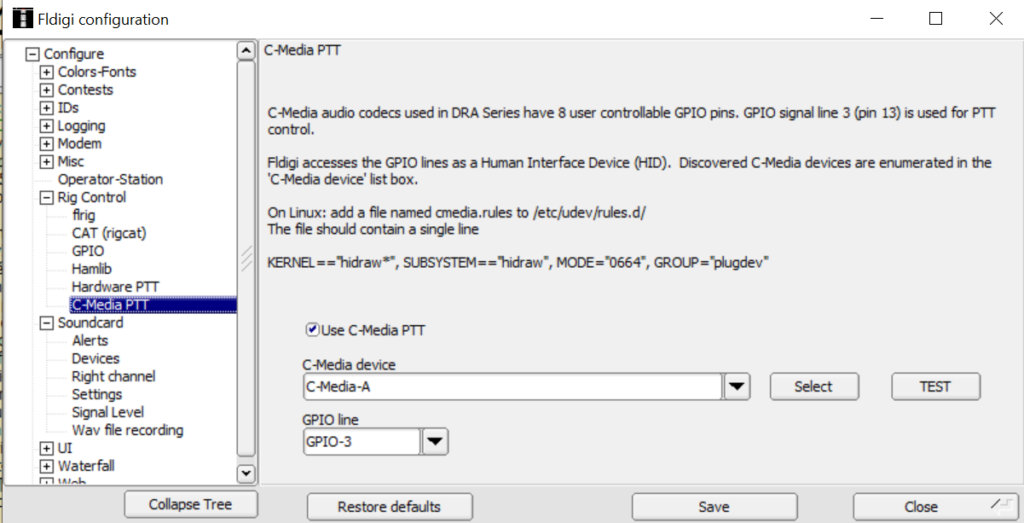
In the Config Dialog click on Rig Control / C-Media PTT
- Check Use C-Media PTT
- Pick the correct C-Media device
- The GPIO line most likely is GPIO-3
- Click Select
- The TEST button will key the rig multiple using the DRA PTT. The DRA red light should flash and your rig should key accordingly. Be sure it is on an available frequency.
Be sure to click on save before you exit the program or you may have to set it up again! That’s it! If I missed a step. Please let me know
Just followed your instructions to set up FLdigi to work with DRA-35 and the red light flashed when the test button was pressed so good so far. Will test with the net perhaps next week. Thank you!
Thanks Susanna. Hope to hear you on the next monday night net. 73
I have my fldigi set the way you have listed but my master communication dra100 will not transmit, any ideas?
Thank you
Hi,
Just verifying that you disabled VOX by removing the jumper ju6 on the dra board. You can contact me directly by email at ae7vx.don@gmail.com.
thank you does that mean taking the unit apart?
winlink works great, just cant transmit on fldigi.
Ridge
Hey Ridge, sorry for the late reply to this, but if you didn’t get this fixed before check out the sound card settings in this post on the DRA-100 and see if this does the trick:
https://www.psdhn.org/2023/08/07/fldigi-configuration-with-dra-100/
I was setting this up with a DRA-36 card and the red LED on the soundcard flashes but does not key the Icom 9100 during test.
Hi Todd, Sorry for the delay, Did you resolve your issue? I”m not sure why you need a DRA-36 if you have an Icom 9100. The IC-9100 has everything it needs to run digital modes built into the radio (basically the equivalent of a SignaLink USB or DRA-36 which is built into the radio). If you own an IC 7100, then you would need a soundcard.If it is a 7000 or 7100, it’s uaually a configuration (programming in the radio). Let me know if you have any further questions.
Hi Don et al
FLDigi 4.2.06, DRA-36, Windows 10, HYS TC-8900r. Set up as documented above, but TEST button does nothing.
Winlink on this setup works fine, so the DRA card is talking to the computer at least in that program. I have heard more than once that Winlink and FLDigi sometimes don’t get along on the same machine, but I don’t have hard evidence of that. Or…maybe I’m looking right at that evidence 😛
Any suggestions are welcome!
73,
Tim
Hi, Don et al
Forgive me if this is a duplicate message – the page said that I had already sent my comment, but I don’t see it here. Maybe it takes a few minutes to post?
Anyway: my setup is as follows:
Windows 10
FLDigi 4.2.06
DRA-36
HYS TC-8900r (the Yaesu 8900 clone)
Verified my configuration is as you’ve documented here; but the TEST button yields nothing.
The computer does know how to talk to the DRA, because Winlink works fine on this setup. I have heard in the past that some folks have a hard time getting both Winlink and FLDigi to coexist on the same platform (at least, using the same sound card).
Any suggestions welcome.
73!
Tim
Souds like you got it working. If not, let Christian or I know. The HYS TC-8900r flaw is that the mic is on when you’re transmitting on digital mode so be careful speaking near the mic when the computer engages the transmitter.